Compass Basics
Every hiker in the world should know the basics of navigation. The last thing you want to do is get lost in the woods. To stay on course, navigators have historically relied on the simplest tools of all - a map and compass. Not only are they easy to use, but they can also save your life one day, a major plus in my book!
Whether you’re trying to find a hidden gem on a map, bushwhacking an undiscovered trail, or plotting the quickest way from point A to B, there’s nothing more reliable and trustworthy than a handheld map and compass. They truly are one of the essentials every explorer needs.
Sadly, in today’s age of science and technology, most hikers rely on GPS devices for their navigational needs. Be it an app on their phones, watches, or dedicated GPS handhelds. Most of the time this is fine, but there are situations where technology can fail you.
The batteries can lose power, the device can get damaged in several ways, the weather can influence the strength of signals, deep canyons might block your line of sight, and so on. The point is to never trust your life to something that needs to be plugged in or recharged.
That’s where this guide comes in! In this article, I plan to go over 5 major concepts of using a map and compass. They are -
-
The components of a compass
-
Aligning a compass with a map and learning about magnetic declination
-
Navigating with a map and compass
-
Adjusting for declination
-
Measuring distance on a map
I’m sure after you’ve read through this article, you’ll be more than comfortable handling a compass to find your way. I highly recommend practicing with one before you venture too far off the grid, just in case.
So what do you think? Interested in learning this incredibly important survival tool? Great! Let’s get started:
1. The Components of a Compass
Before we get into how to use a compass, we need to know about the different elements of one. What do the little dashes or numbers, lines, and angles mean, and why they are important? Some of these you might already know, but in case you don’t, let’s go over it, using the elements of Image 1, below.
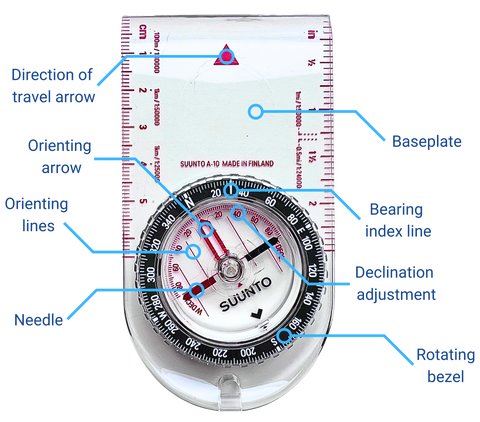
Compass anatomy
-
Needle - This is the floating piece that positions itself with magnetic North. On most compasses, it’s either the red or white end, with the black end pointing towards the opposite direction.
-
The direction of travel arrow - Point this to where you want to go. It’s the direction you point to when you need to find or take a bearing.
-
Baseplate - This is what the compass sits on top of. It’s clear so you can see your map underneath. You’ll use the sides/edges of it to find distances and take bearings.
-
Rotating bezel - Used to set direction/bearing to target.
-
Bearing index line - Used to read the bearing.
-
Orienting lines - You align these with your map to orientate with True North.
-
Orienting arrow - Align with the needle to find your direction to target.
-
Declination adjustment - Used to calculate the difference between true North and magnetic North.
2. Aligning a Compass with a Map and Learning About Magnetic Declination
If you know anything about using a compass, you’ll know that finding “North'' is a common, and arguably most important thing you’ll need to do. It’s the basis for all modern land navigation. It’s how you get the lay of the land so to speak.
But not so fast. Did you know there are 2 different “Norths” that you’ll need to find? True North and Magnetic North. Depending on where you are in the world, the difference between the two in direction can be up to 20 degrees.
Each 1° off of your bearing equates to about 100 feet per mile, so 20 degrees throughout a mile traveled is roughly 2000 feet in the wrong direction. About a ⅓ of a mile away from where you want to be. Go 2 miles and now you’re ⅔ of a mile off. You get the picture.
So the first thing to do is take your compass and align it with true North and your map. Use the orienting lines to help if need be, as shown in Image 2 below.

Pro tip - Make sure there’s nothing metallic or magnetic near your compass or your needle is going to go all wonky! This includes cell phones, wristwatches, keys, etc.
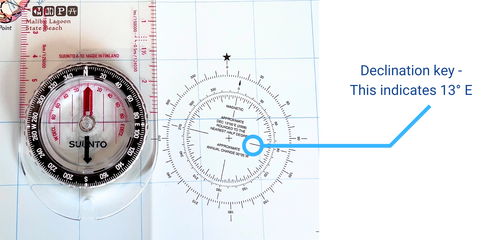
Next, look for a degree of declination indicator somewhere. Find it and learn how many degrees magnetic North and true North differ (see Image 3 below). It’s hard to see, but this map has a 13° magnetic declination, due East.
You’ll use this after you get a bearing and start moving, but it’s good to know where to find it now and how many degrees it is. Later I’ll teach you how to adjust your bearing to account for declination.
3. Navigating with a Map and Compass
Ok, you’ve got everything lined up and are now ready to take a bearing. In other words, find the way you need to go.
Pro tip - Bearings are always relative to specific locations, so if you follow the same bearing from two different starting points, you WILL NOT end up at the same location.
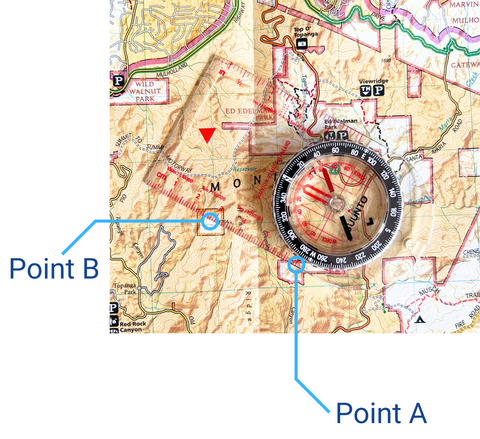
Place your compass on the map, using one of the edges of the baseplate to draw a line between your starting point (Point A) and your destination (Point B). Make sure the direction of travel arrow is pointing toward your destination (see Image 4 below).
Now rotate the bezel until the hollow red orienting arrow and red orienting lines are parallel with the blue meridian lines of your map, with N on your compass bezel pointing North (see Image 5 below).
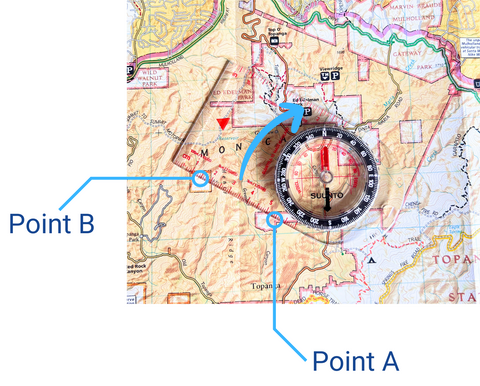
Look at the bearing index line to read the bearing you just captured. For this image, that’s roughly 300° due NW.
Great job! You’ve got a bearing. Now all you do is stand up, hold your compass level with the ground at about waist height, and turn until the red needle fits within the hollow red-orienting arrow (see Image 6 below). A lot of hikers use the term “Red in the shed” as a helpful reminder.
The direction of the travel arrow is now facing the bearing you captured on the map. You can follow it to reach your destination.
It might take you a few minutes to lock this skill down. Don’t get frustrated, it can be confusing at first, but once you get a hang of it, it’ll be as easy as riding a bike. You won’t have to think, it’ll be like second nature.
4. Adjusting for Declination
Different compasses have different ways to adjust for the magnetic declination. Some have a fixed scale or markings, like the compass I’ve been using for this guide, while others have an adjustable declination built into the compass. It might even require a tool or key to manually adjust the reading.
For the interest of this guide, I’ll just go over how to use the compass I’ve been showcasing throughout. Since it’s a fixed scale, the adjustment is quite easy.
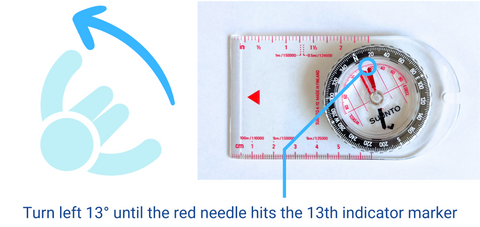
After you’ve aligned your red needle within the red-orienting arrow, “Red in the Shed”, and you have your bearing, you’ll need to make one additional adjustment.
Remember the degree of declination from earlier? That’s right, it’s 13° due East. That means you will now hold your compass and turn to the left an additional 13°’s until the red needle is on the 13th indicator marker on the declination adjustment scale (see Image 7 below).
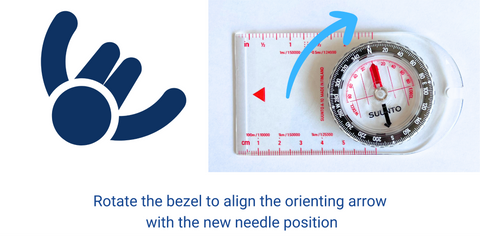
Hold the compass as still and steady as you can. Rotate the bezel until the orientation arrow lines up with the new red needle position ( see Image 8 below).
That’s it! Told you it was easy. Now you have a perfectly adjusted compass with a correct bearing to your destination. Some other quick tips -
-
Always make sure the direction of the travel arrow is facing toward your desired location. It’s easy to point the wrong way if you’re headed South for example and you forget to turn your compass correctly.
-
Buy or use up-to-date maps as magnetic North changes slightly over time. Any map over 10-15 years old will be inaccurate by a few degrees.
-
Take notice of natural or manmade landmarks before setting out on a journey. It’ll help you locate where you’re at on your map.
-
Take frequent readings at regular intervals along your trail. This way you won’t have to make huge changes or even reroute your entire path along the way if you become lost or disoriented.
5. Measuring Distance on a Map
Most compasses, if not all, come with a built-in distance scale right along the edges of the baseplate. This is given as a ratio for either inches to miles, centimeters to meters/kilometers, or both. It usually looks like this - 1:40,000.
For a map that uses inches, this means 1 inch on a map equals 40,000 inches on the ground (Image 9).
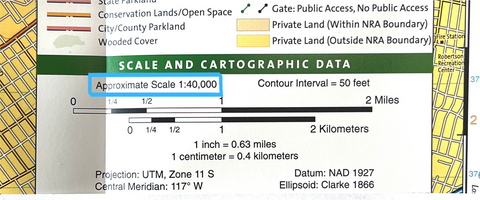
You can also see it provides metric distances, but not a metric scale. If you’re traveling abroad, you’ll most likely run into maps that ONLY have metric scales on them, so it might be wise to purchase a standard map before heading overseas if you’re more comfortable using inches/miles.
Sometimes a few different scales are provided that might confuse you. The compass I’ve been using has 5 of them actually and they all mean different things. Let’s go over them (Image 10).
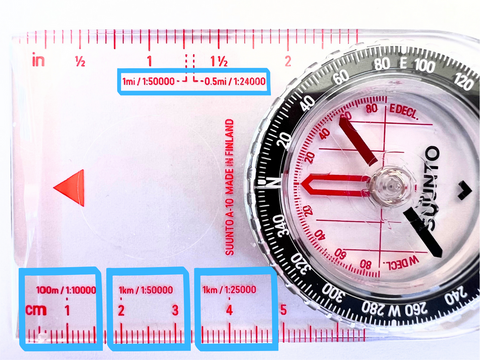
First, there’s the inch side. You’ll see there are two different ratios. 1mi/1:50,000 and another of 0.5mi/1:24,000.
This means that on a map that uses the scale of 1:50,000, 1 inch on a map = 1 mile in real distance. For a map that uses a scale of 1:24,000, 1 inch on a map = .5 miles in real distance.
Always be aware of the distance scale on any map you use. There is no standard ratio used so be mindful.
On the metric side, things get a bit more interesting. As you can see there are 100m/1:10,000, 1km/1:50,000, and 1km/1:25,000, BUT they correlate directly with the markings on the baseplate. You can see the little red notches that point to the different cm markings.
This can be something that is easily missed so try and be aware of all the details. See, I told you it can get confusing!
Since it’s metric, all of these ratios use centimeters instead of inches for the corresponding distances.
On a map that uses a scale of 1:10,000, every 1 cm equates to 100 meters.
Buuuuuut, on a map that uses the scale of 1:50,000 every 2 cm equates to 1 kilometer. You can see where that red notch links the 1km to the 2cm mark on the baseplate.
On a map that uses the scale of 1:25,000, every 4 cm equates to 1 kilometer. Again the red notch between the ratio and the centimeter markings.
I know I didn’t quite get it at first so I hope this little explanation of the scales and ratios helps you understand how it all works!
Final Thoughts
Hiking and backpacking, while being a lot of fun, isn’t without its dangers. There are many, many stories of well-seasoned adventurists getting lost in the woods and never making it back home safely. There’s no doubt in my mind that at least a few hikers could have saved themselves if they only carried a basic map and compass and knew how to properly use them.
Not only is the safety component there, it’s kind of fun to learn! You can make a game out of it with friends and family, or simply challenge yourself with multiple trails or distances.
The point is, there are many reasons to use a map and compass, and very few not to. They are lightweight, take up minimal space in your bag or pocket, and have near-perfect accuracy, plus they could save your life one day!
Well, I guess that’s it. I sincerely hope you enjoyed reading this article and have learned something new to take with you on your next hiking adventure. Be safe, and happy hiking!
About the Author

James Ryan is a seasoned hiker and adventurer who loves to travel and experience new things. An extrovert and creative at heart, James is most definitely a "People Person". He started his blog - thejamesguide.com in the hopes of sharing his knowledge and expertise. Look him up and give him a shout today!


0 comments